Create Bondage Pants
If you want a pair of bondage pants and can't afford to buy them, you can make your own without too much trouble. For a quick pair of pants, you can use safety pins. If you want a more permanent look, stitching up the pants with a needle and thread works quite well. Creating bondage pants on your own takes patience and ingenuity, but the results are worth it.
Contents
Steps
Using Safety Pins
- Put the pants on and using safety pins, pin off the extra loose material on the inside seam of the legs. This is just going to be a mark so you know where to sew them later.
- Turn the pants inside out and peg them all the way up the inner seam - you can do this by hand with a needle and thread - it takes more time with than with a machine but it works. .
- Zippers can be bought fairly cheap at a fabric store. You can glue or stitch those on too. This allows you to get them looking exactly how you want.
- You can also just put the pants on and wrap all the loose fabric back really tight then, using safety pins, pin the loose fabric tight against your leg.
Using Stitches
- Get a good pair of black pants.
- Get some black {{safesubst:#invoke:convert|convert}} webbing.
- If you're really slick, attach zippers so that they access the pockets already on the pants. The zippers are easy to attach just by doing a neat stitch to hold them down. Pin them in place before you start stitching. You might even want to try the pants on and mark with a safety pin exactly where you want them.
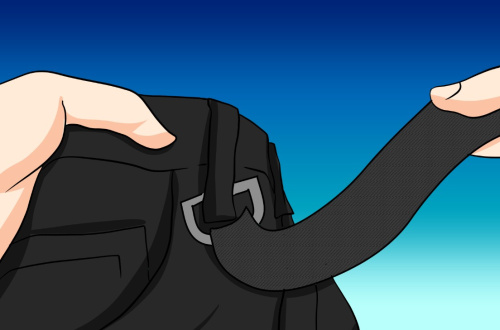
- Put D rings on all the belt loops to maximize strap possibilities, also attach them along the outer side seams. Place one pair just below your waist and one just below you knee. Do this by putting {{safesubst:#invoke:convert|convert}} of webbing through the ring.
- Stitch in a square and then an 'X'. {FIG. 2} Webbing has a tendency to unravel and this will help keep that from happening, it will also reinforce the rings. You want these to be as strong as possible! {Note: the rings on the above pants are actually turned the wrong way... this is so you can see their placement. The rings should be horizontal and the webbing holding them on going down the leg.}
- Make your straps. Depending on your height you'll want to make them about {{safesubst:#invoke:convert|convert}} long. For every strap you'll need 3 feet {{safesubst:#invoke:convert|convert}} webbing, and 2 clasps. These can be found at fabric stores, hardware stores, camping supply and military surplus stores, and in many hardware sections of discount stores like Walmart. Loop the webbing around the loop on the clasp, and do the square/X stitch as above. Do this on both ends.
- Attach your straps in an 'X' pattern, or just to the rings on the belt loops.
Tips
- To add more creativity into your bondage pants, use brightly colored thread, such as neon or glow-in-the-dark green, blue, or pink.
- You can also buy or make patches/buttons for your favorite bands
- You might want to put the pants on first to see where you want to place things.
Warnings
- Do not pin your pants to your skin.
- Make sure you understand what to do before spending any time or money on these pants.
- Do not pin your legs together.
Things You'll Need
- Method One
- Pants
- Safety Pins
- Needle and thread
- Zippers (optional)
- Method Two
- A good pair of black pants. Ideally they should have slightly tapered legs. Make sure all the hardware (zipper and any rivets) is silver tone. Brass hardware will look totally out of place unless you use brass d-rings, etc. for everything else. If you can find a pair of black pants, not jeans, that have lots of rivets on them, that's all the better. Lots of pockets won't hurt either.
- Black {{safesubst:#invoke:convert|convert}} webbing.
- D-rings
- Clasps
- Needle and thread
- Zippers (optional)
Related Articles
- Press Pants
- Stretch the Waistline of Your Pants
- Shorten Pants Without Hand Sewing
- Make a Ninja Outfit
- Wear a Total Black and White Outfit
