Detect Fake Euros
The Euro is the national currency for some 340 million people in nineteen European countries, and there are roughly thirteen billion paper notes in circulation. It should be no surprise, then, that counterfeiting is an ongoing problem with Euros. If you are familiar with the basic features of each Euro denomination, and know how to check the advanced security features embedded within each bill, the vast majority of fake Euros can be detected.
Contents
Steps
Observing General Details
- Recognize proper styles and colors. First and foremost, you should be aware that Euro bills come only in denominations of 5, 10, 20, 50, 100, 200, and 500. So, if you are handed a €15 note, reject it immediately. Each legitimate Euro denomination also has a standard color palette and image style.
- Euros feature distinctive styles of architectural imagery from different periods of European history. The front of each bill shows a window, door, or gate motif; the rear, a bridge (along with a map of Europe).
- Five Euro bills feature Classical architecture and are predominantly gray in color.
- Ten Euro bills feature Romanesque architecture and are predominantly red in color.
- Twenty Euro bills feature Gothic architecture and are predominantly blue in color.
- Fifty Euro bills feature Renaissance architecture and are predominantly orange in color.
- One-hundred Euro bills feature Baroque / Rococo architecture and are predominantly green in color.
- Two-hundred Euro bills feature iron and glass architecture and are predominantly yellow-brown in color.
- Five-hundred Euro bills feature Modern architecture and are predominantly purple in color.
- Measure the bills. Unlike U.S. currency, for instance, Euro bills are different sizes. This hinders counterfeiting somewhat, but is mainly done for the benefit of the visually-impaired.
- €5 = 120 x 62 mm
- €10 = 127 x 67 mm
- €20 = 133 x 72 mm
- €50 = 140 x 77 mm
- €100 = 147 x 82 mm
- €200 = 153 x 82 mm
- €500 = 160 x 82 mm
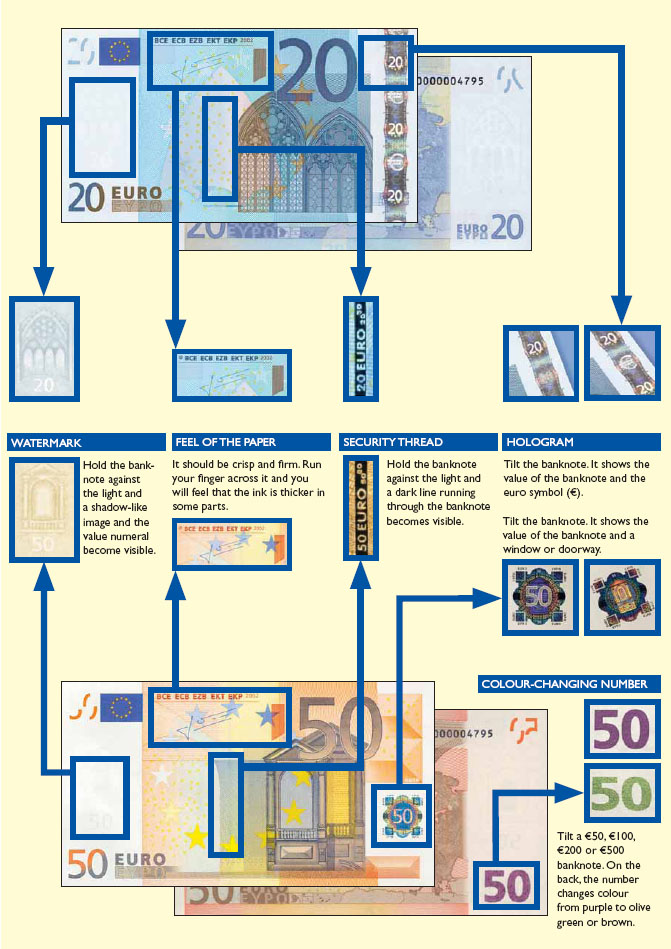
- Feel the distinctive paper. Euros are made of 100% cotton fiber, which enhances durability and gives the bills a distinctive feel. Real Euros should feel crisp and firm, and the print should feel raised in areas where the ink is thicker.
- Fake Euros tend to feel limp and waxy to the touch, and often lack the raised print texture.
- The older and more worn the Euro bill is, the more difficult it may be to distinguish these features. Even then, however, an experienced handler of Euros can likely tell the difference.
- Look out for the Europa Series. The European Central Bank has over the past few years been slowly rolling out a new series of Euro bills. These are widely known as the Europa Series because some of the major security enhancements involve imagery of the Greek mythological figure Europa.
- These bills include a watermark portrait of Europa (a female), visible when the bill is held up to light.
- They also include a hologram image of Europa in the silver security stripe, which becomes visible when the bill is tilted.
Checking Security Features
- Watch for the watermark. All Euros have a watermark image that becomes visible when the bill is held up to light. The image replicates an architectural image from the bill. It is located on the left side of the front of each bill.
- On real Euros, the watermark is created by a variation in the actual paper thickness. The image will be clearly visible when held up to light, and there will be smooth transitions between the light and dark elements of the image.
- On fake Euros, the watermark is usually printed onto the paper. The image is usually not as clear, and often there are sharp light-dark transitions when it is held up to light.
- Handle the hologram. All Euros feature a hologram image. Depending on denomination, it will appear either as a vertical stripe or a rectangle on the right side of the front of the bill. Tilting the bill’s orientation in relation to your eyes will reveal changes in the image.
- On real Euros, the hologram will clearly change when tilted. The actual image varies by denomination and series (the newer Europa Series utilizes her portrait, for instance).
- Fake Euros usually lack an actual hologram, meaning the image remains static when the bill is tilted.
- Study the security thread. All Euro denominations include a security thread which appears as a vertical stripe in the center-left area of the front of the bill. The thread is not printed on the bill, but is actually embedded in it.
- The security stripe on real Euros always appears as a very dark stripe when held up to light. It also includes, in tiny but clear lettering, the number denomination and the word “EURO” (or, in the new series, “€”).
- On fake Euros, the security stripe is usually just a printed grayish-black line. It does not appear very dark when held up to light, and usually has micro-printing that is either blurry or nonexistent.
- Check for color changes. In addition to holograms, Euros also utilize color-shifting elements when bills are tilted. Look for the numeral value of the bill on the back right. Note, however, that only denominations of fifty Euros and above use this technology.
- The denomination numeral on the back of a real Euro will shift in color from purple to green or brown (depending on denomination) when tilted.
- Most fake Euros lack this effect, meaning the numeral remains purple when tilted.
- Mind the micro-printing. Micro-printing that is illegible to the naked eye but becomes clear under magnification requires sophisticated printing techniques that are beyond the ability of most counterfeiters. All Euro bills utilize some micro-printing elements. Depending on denomination and series, they can appear in the word “EURO” or the star decal, for instance.
- To the naked eye, micro-printing on legitimate Euros will appear as a thin line. With the aid of a magnifying glass, however, clear print will be visible. A running repetition of the numeral denomination of the bill is commonly found in micro-printing.
- On fake Euros, the micro-printing is normally either blurry under magnification or non-existent. A good magnifying glass is therefore a handy tool when you need to weed out possible fake bills.
- Uncover ultraviolet and infrared properties. Holding Euros up to standard light sources reveals many of the key security features. Using ultraviolet (UV) or infrared technology, however, reveals special features as well.
- Real Euros do not emit a “glow” under UV light. Fibers embedded in the bill do however emit areas of coloring that vary by denomination. Newer bills emit three colors under UV light.
- Under infrared light, only the far right side of the printing on the front of a real Euro, including a small bit of the architectural image and the hologram, will remain visible.
- Under UV light, fake Euros usually emit a bright glow and reveal the fake watermark and security thread as dark lines.
- The text and images of fake Euros are usually either completely visible or invisible under infrared light.
Related Articles
- Check if a Banknote Is Genuine
Sources and Citations
- http://europa.eu/about-eu/basic-information/money/euro/index_en.htm
- ↑ http://ec.europa.eu/economy_finance/euro/cash/banknotes/images_en.htm
- ↑ https://www.ecb.europa.eu/euro/changeover/lithuania/shared/files/Real_or_Fake_EN.pdf?c6843fed3b19e09f7511cbd957bbb632
- http://www.fleur-de-coin.com/images/eurocoins/banknotes/banknotesecurity.jpg
- https://www.ecb.europa.eu/euro/changeover/lithuania/shared/files/Real_or_Fake_EN.pdf?c6843fed3b19e09f7511cbd957bbb632